

Follow the documented routes below and use the checklists to review your own results. Read our source notes.
1Rule out a misplaced audio segment
Place the generated performance beside the original audio. Confirm the source file, phrase start and any silence removed before upload. A different mix, a trimmed intro or a shifted clip can create a mismatch even when the generated phrase was aligned to its own input.
- Listen to the source segment and the timeline at the same timecode. They should contain the same words and performance.
- Temporarily remove transitions and speed changes from the test clip. Compare it in isolation.
- Write down the source start and end times and the clip’s position in the edit. Keep these fixed for the next attempt.
- The mouth is early or late by a similar amount throughout
- Try shifting the clip against the original audio in small increments. Recheck two later mouth closures before deciding it is a generation failure.
- It begins aligned, then drifts
- Look for a speed change, stretched clip or different audio version. Return to the original duration and segment before retrying.
- Only a few sounds look wrong
- Keep the current alignment and inspect that phrase. The problem may be in the generated performance rather than the timeline.
Ready to continue: You know which audio segment the model received and where that segment belongs in the final song.
2Use one phrase as your comparison
Pick a short phrase with a clear start and visible mouth closures, such as sounds made with the lips together. Inspect the onset, a middle landmark and the end. Singing can stretch vowels; one convincing mouth shape is not enough to judge the whole phrase.
Record the same phrase on every attempt. Note “late throughout,” “drifts by the end” or “face changes on the high note” instead of a vague bad/good rating. The diagram is an illustration of alignment, not measured output from a tool.
- Watch once with sound at normal speed for the overall impression.
- Scrub the same landmarks to locate the first mismatch.
- Keep the source, model and camera framing visible in your log so later changes are comparable.
Ready to continue: You can name the mismatch and the point where it begins.
3Use the singing workflow for your tool
Beat synchronization and mouth synchronization solve different problems. Use the lip-sync or vocal control when a visible performer needs to sing. For a diagnostic retry, choose a clear face and a modest movement; that is our suggested test setup, not a guarantee of accuracy.
 freebeatShow steps
- The separate Lip Sync creator takes Upload Video and Upload Audio inputs. Use the approved performance clip and its exact phrase.
- Check the currently selected model, supported lengths and price before Create. The page’s model-dependent marketing text is not a reliable universal credit rate.
 Neural FramesShow steps
- In Autopilot, use Vocal Video for singing. The handbook also describes enabling it for selected keyframes.
- Check which shots actually have the vocal setting before rendering; enabling a workflow does not mean every scene becomes a singing performance.
 OpenArtShow steps
- Open the current Lip-Sync workspace. Under Choose who talks, supply an image, video or saved character.
- Under What will they say, choose the exact audio. Check the selected model’s duration limits and quote. Motion Sync is a separate body-motion workflow.
 PixoShow steps
- Enable Lip Sync on the music-video upload form. In the project, review which performer is assigned to each vocal part.
- Inspect the storyboard timing and revise the affected shot. Use story shots during instrumental passages.
 KaiberShow steps
- Use the separate Canvas Create Video → Image Lip Sync or Video Lip Sync route. Sequence does not lip-sync, and Montage’s guide says to avoid lip-sync instructions.
- Add one clear face and the exact audio phrase. Check the selected mode’s length limit and credit quote; inspect the short result against the original mix.
 SolmiShow steps
- Supply a clear, front-facing performer reference and verify the vocal phrase and detected lyrics in your project.
- Inspect the singing shot in the short sample. If it fails, revise that shot and check the regeneration price before extending to the whole song.
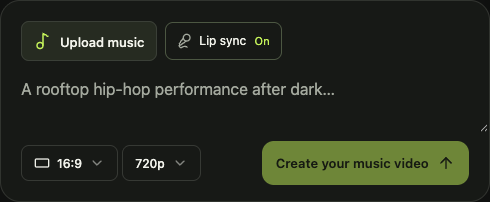
Ready to continue: The intended phrase, performer and singing mode are selected. Check current model limits before paying.
4Make one targeted revision
Choose the change that addresses the diagnosis: correct a trim, simplify a camera move or use a clearer face input. Keep the same phrase. Set a retry ceiling before generating, and retain the original so you can compare the exact landmarks.
OpenArt’s help describes automatic credit returns for failed generations in many cases. Check your credit history and contact support with the generation ID if a refund is missing; do not count an expected refund as available credits. [25]
- Face details warp through the phrase
- Try a stable, visible face with less movement. If it remains unusable, shorten the performance insert or use a cutaway.
- A new attempt is different but not better
- Compare the same three landmarks. Keep the stronger version and stop when the preset retry budget is reached.
- The clip is correct alone but wrong in the sequence
- Check the final edit’s trims, speed and transitions before generating again.
Ready to continue: Keep the revision only if it improves the diagnosed problem without introducing a worse one.
5Check the performance in the exported song
- Return to the original master audio and place the selected clip at the recorded timecode.
- Watch the entry into the performance, the middle of the phrase and the cut out. A transition can obscure a problem without fixing it.
- Use a story or instrumental shot where a repeated vocal attempt does not meet your standard.
- Export and play the actual downloaded file. Check the same landmarks again and keep the successful settings in your log.
A usable final video can mix singing shots with non-singing scenes. Decide where seeing the words performed adds something to the song, then spend the revision budget on those moments.
Ready to continue: The exported performance follows the intended vocal phrase and the full edit keeps the original soundtrack intact.
Keep a record for your next attempt
Download a worksheet to record your own inputs, settings and costs.
Download the lip-sync logSources & workflow notes
Original tool research checked 17 November 2026; Kaiber and Solmi checked 18 November 2026. Official documentation explains the controls; attributed creator reports provide context for the checks suggested in this guide.
- Neural Frames: the four stages of AutopilotOfficial handbook and annotated interface screenshot · updated 2026-04-09
- Pixo: music-video workflow and upload limitsOfficial product page and public creation form
- OpenArt Director: reported revision and audio-alignment issuesUnverified customer complaint with a support follow-up
- Kaiber: Music Video Montage 2.0Official workflow guide and interface image
- Kaiber: Music Video Sequence 2.0Official workflow documentation
- Solmi: music-video generatorOfficial product description and public creation interface
- Solmi: music-video DirectorOfficial workflow and credit documentation
- Solmi: free music-video allowanceOfficial trial conditions
- Kaiber: Lip Sync in CanvasOfficial workflow documentation
- OpenArt: help and workflow questionsOfficial documentation / public interface
- OpenArt: current Lip-Sync workspaceOfficial documentation / public interface
- freebeat: Lip Sync creatorOfficial documentation / public interface
Controls and plan eligibility can change. Confirm the model, quote and account conditions in your project. See our research notes for the scope of the sources used here.
Sources and research notesSave this page
Save this page to revisit the sources and advice, or share it with someone working on a music video.