

Follow the documented routes below and use the checklists to review your own results. Read our source notes.
1Lock the audio and the destination
Put the final mix in a project folder and give it an unmistakable name, such as song-final.wav. Keep every generated clip beside that file. If you change the mix or remove an intro later, your storyboard timings and singing clips may need to change too.
- Choose the destination before generation: a landscape video, a vertical clip or another delivery format. Use that aspect ratio throughout the project.
- Listen once and note the start of the intro, verses, chorus and ending. Mark where a face needs to sing and where a story shot or abstract visual will do.
- Write down a credit ceiling for the first attempt and one revision. A free account is a way to explore the interface; check whether its trial actually covers your chosen workflow.
For Pixo, upload an audio file rather than a Suno or Udio share link. Its public uploader lists MP3, WAV, OGG and M4A. Confirm the current file limit and plan eligibility on the upload screen. [12] [13]
Ready to continue: You have one master audio file, a target aspect ratio and a short list of song sections.
2Turn one idea into a shot plan
Start with a visual sentence that can survive several scenes. Then give each song section one job: introduce the person, establish the setting, build movement or deliver the chorus. A first video is easier to revise when every shot has a purpose.
Example brief · editorial starting point
A singer in an orange jacket walks through a quiet seaside town at dusk. Keep the same face, short dark hair and jacket. Verses follow the walk; the chorus becomes a front-facing performance. Use warm natural light and a landscape frame.
Use the downloadable shot plan to record start and end times, the action and whether lip sync is needed. The illustration above shows a planning structure; it is not a sequence generated by one of the reviewed tools.
- Pick one clear performer reference if your chosen workflow accepts it.
- Include a simple shot, a moving shot and a singing shot if singing matters to your idea.
- For a practice run, aim for a short representative excerpt, for example 20–30 seconds. This is our suggested exercise, not a universal tool limit; if the full-song workflow rejects it, use a supported clip length or check the storyboard before rendering.
Ready to continue: You can explain what each practice shot should show before spending credits.
3Follow the route for your chosen tool
Open one route below. Check the displayed credit estimate before committing, and inspect the planned images before generating motion wherever the workflow allows it. These routes follow official documentation; we have not completed a controlled production run across these products.
 freebeatShow steps
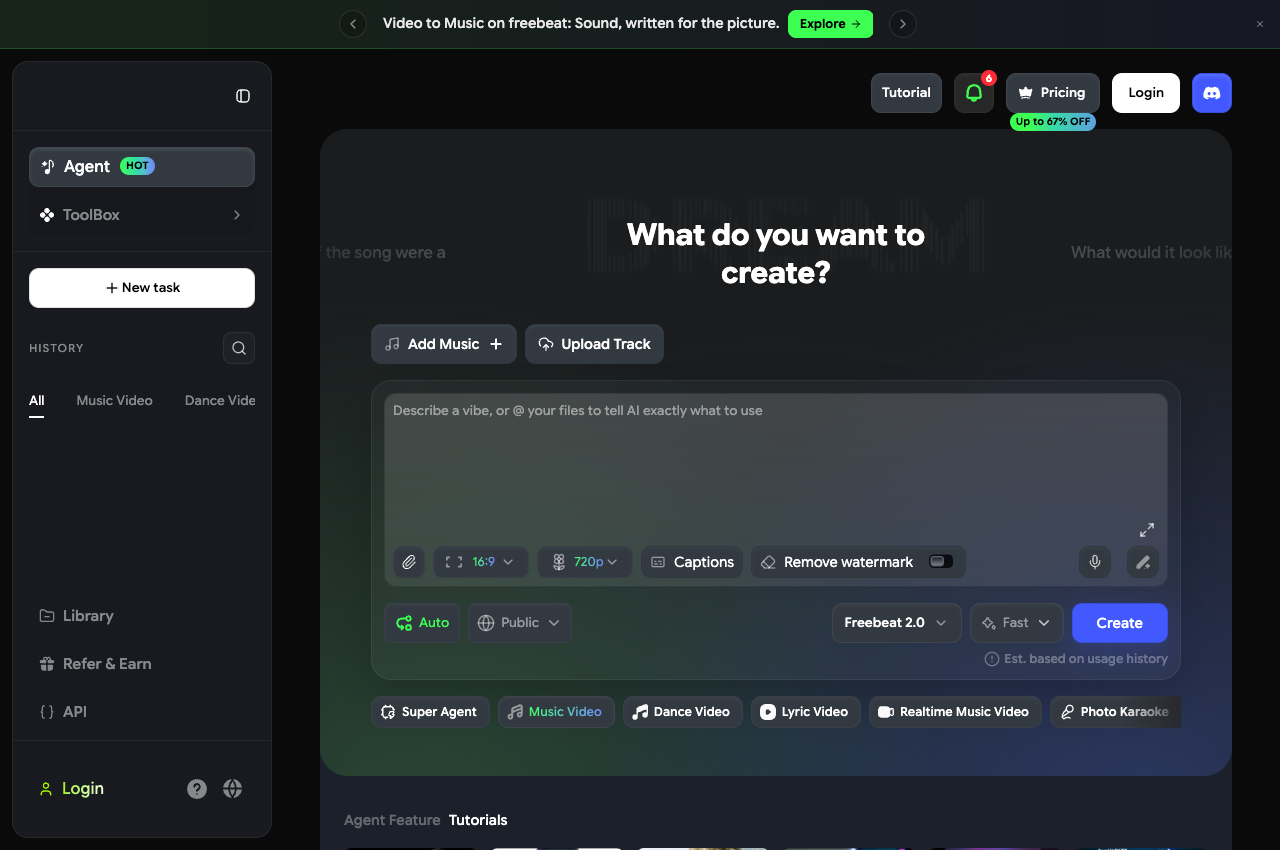
- Open the music-video creator and select Freebeat 2.0. Add Music, enter your idea and choose the output settings.
- Turn Auto off to review stages. Work through Track, Visual Style and Creative Brief; inspect Reference Images and Scene Planning before clips.
- Correct a weak scene image before generating Video Clips. Check the Final Video against the original song.
 Neural FramesShow steps
- Upload the track in Autopilot. Review Track: lyrics, character, style and concept.
- Inspect Storyboard prompts and the model cost. Use the Create Video dropdown → Generate Starting Images to review stills first.
- Fix weak starting images, then generate video. Check the estimate first: the handbook says a started generation cannot be paused or cancelled.
 OpenArtShow steps
- Open Director and choose the Music Video starting point. Add your song and describe the sequence.
- Choose or create reusable character and world references. Inspect the planned scenes before proceeding.
- Use scene-level chat edits and the timeline to refine the draft. Confirm the selected model and its credit quote.
 PixoShow steps
- Upload the song in the music-video generator. Set creative direction, aspect ratio and resolution; enable Lip Sync if the plan needs singing.
- Review the storyboard for performers, scene ideas and timing before producing the full sequence.
- Refine the selected shot and review the timeline before export. The public guide describes these stages; post-login labels can differ.
 KaiberShow steps
- Choose Montage for one setting, Sequence for changing settings, or Lyric Video for words on screen.
- Add the track and describe the subject, action and look. In Reference mode, supply the image that should guide the sequence.
- Check the workflow’s supported duration and credit estimate. Start with a supported short version; inspect continuity before committing to the full track.
 SolmiShow steps
- Upload the downloaded MP3 or WAV and choose 16:9 or 9:16. Add performer photos if needed.
- In Director, review the brief, cast references and storyboard. Use plain-language notes to correct a weak shot before rendering.
- Check the displayed charge before each stage. Use the short watermarked sample to inspect the result, then price a full render and one shot revision.
Ready to continue: Keep a draft only if the performer, framing and intended action are usable. Save the quote, actual credits and one revision result before extending the project.
4Build the cut around the original track
Put the usable clips over the master audio in the tool’s timeline or an external editor. Trim to the action that works. A shot does not have to fill its generated duration, and every strong beat does not need a cut. Keep the chorus readable before adding transitions.
- The performer changes between shots
- Return to the approved reference or replace the weakest shot. Use the character-consistency guide before generating more of the same scene.
- The mouth is late but the scene looks usable
- Check the audio offset and exact phrase first. Follow the lip-sync guide before paying for another generation.
- One moment fails repeatedly
- Try a simpler action or a story cutaway that serves the same part of the song. Keep the failed attempt in your cost record.
Ready to continue: Watch the whole cut without stopping. Every scene should earn its place, and the master audio should remain continuous.
5Inspect the exported file, then keep the recipe
- Play the actual download from beginning to end. Check the first sound, the ending and transitions into singing shots.
- Watch again for changes in faces, hands, clothing, captions and camera movement. Inspect at the size where people will watch it.
- Confirm the downloaded resolution and watermark against your current plan. Do this before producing extra versions.
- Save the final file, project, references, prompts, model/settings and credits spent. Duplicate this folder for the next version instead of overwriting the working cut.
For a second pass, use the character, lip-sync and cost guides linked below. Keep the same test phrase or shot while changing one condition, so you can tell whether the revision helped.
Ready to continue: Your deliverable is a checked video file plus a repeatable project record, not just a promising first render.
Keep a record for your next attempt
Download a worksheet to record your own inputs, settings and costs.
Download the shot planSources & workflow notes
Original tool research checked 17 November 2026; Kaiber and Solmi checked 18 November 2026. Official documentation explains the controls; attributed creator reports provide context for the checks suggested in this guide.
- freebeat: public music-video creatorPublic product interface
- Neural Frames: the four stages of AutopilotOfficial handbook and annotated interface screenshot · updated 2026-04-09
- OpenArt: Director modeOfficial product page
- OpenArt: trial and character workflowVendor-authored guide
- Pixo: music-video workflow and upload limitsOfficial product page and public creation form
- Pixo: plans, credits and free accountOfficial pricing; browser-rendered monthly and yearly views
- Creators discuss freebeat in r/SunoAIUnverified community accounts; mixed experiences · published 2026-01-14
- Mind Echoes — EXIT: Neural Frames and manual editingCreator-reported workflow with linked work · published 2026-11-09
- Kaiber: choosing a music-video workflowOfficial workflow documentation
- Kaiber: Music Video Montage 2.0Official workflow guide and interface image
- Kaiber: Music Video Sequence 2.0Official workflow documentation
- Solmi: music-video generatorOfficial product description and public creation interface
- Solmi: music-video DirectorOfficial workflow and credit documentation
- Solmi: free music-video allowanceOfficial trial conditions
- freebeat: Agent 2.0 workflowOfficial documentation / public interface · updated 2026-08-25
Controls and plan eligibility can change. Confirm the model, quote and account conditions in your project. See our research notes for the scope of the sources used here.
Sources and research notesSave this page
Save this page to revisit the sources and advice, or share it with someone working on a music video.