

Follow the documented routes below and use the checklists to review your own results. Read our source notes.
1Write a character brief you can check
Choose the face and two or three details that make the performer recognizable. Keep these fixed while you vary camera distance, action or location. An attractive frame can still be the wrong person; judge identity separately from image quality.
Example identity brief · editorial starting point
Mara: short dark bob, a small beauty mark below the left eye, orange jacket over a plain white shirt. Keep the same face, haircut and outfit in every scene. Scene directions may change the setting, pose and framing.
- Save the approved reference as a named file. Avoid replacing it mid-project without recording the change.
- List what must stay fixed: face, hair, clothing and any defining accessory.
- List what may change: angle, pose, lighting and location. Use one manageable change for the first comparison.
Ready to continue: Someone looking at your reference can point to the exact details you plan to preserve.
2Reuse identity in the tool, not just the prompt
A composition image, a style reference and a saved character can guide different things. Use the control intended for identity, and confirm that the intended character is attached to each relevant scene.
 freebeatShow steps
- In the 2.0 Agent workflow, review Reference Images after the Creative Brief. There is no initial Character button in the new creation row.
- Use a clear image of one person and check that the approved reference carries into Scene Planning and the scene stills.
 Neural FramesShow steps
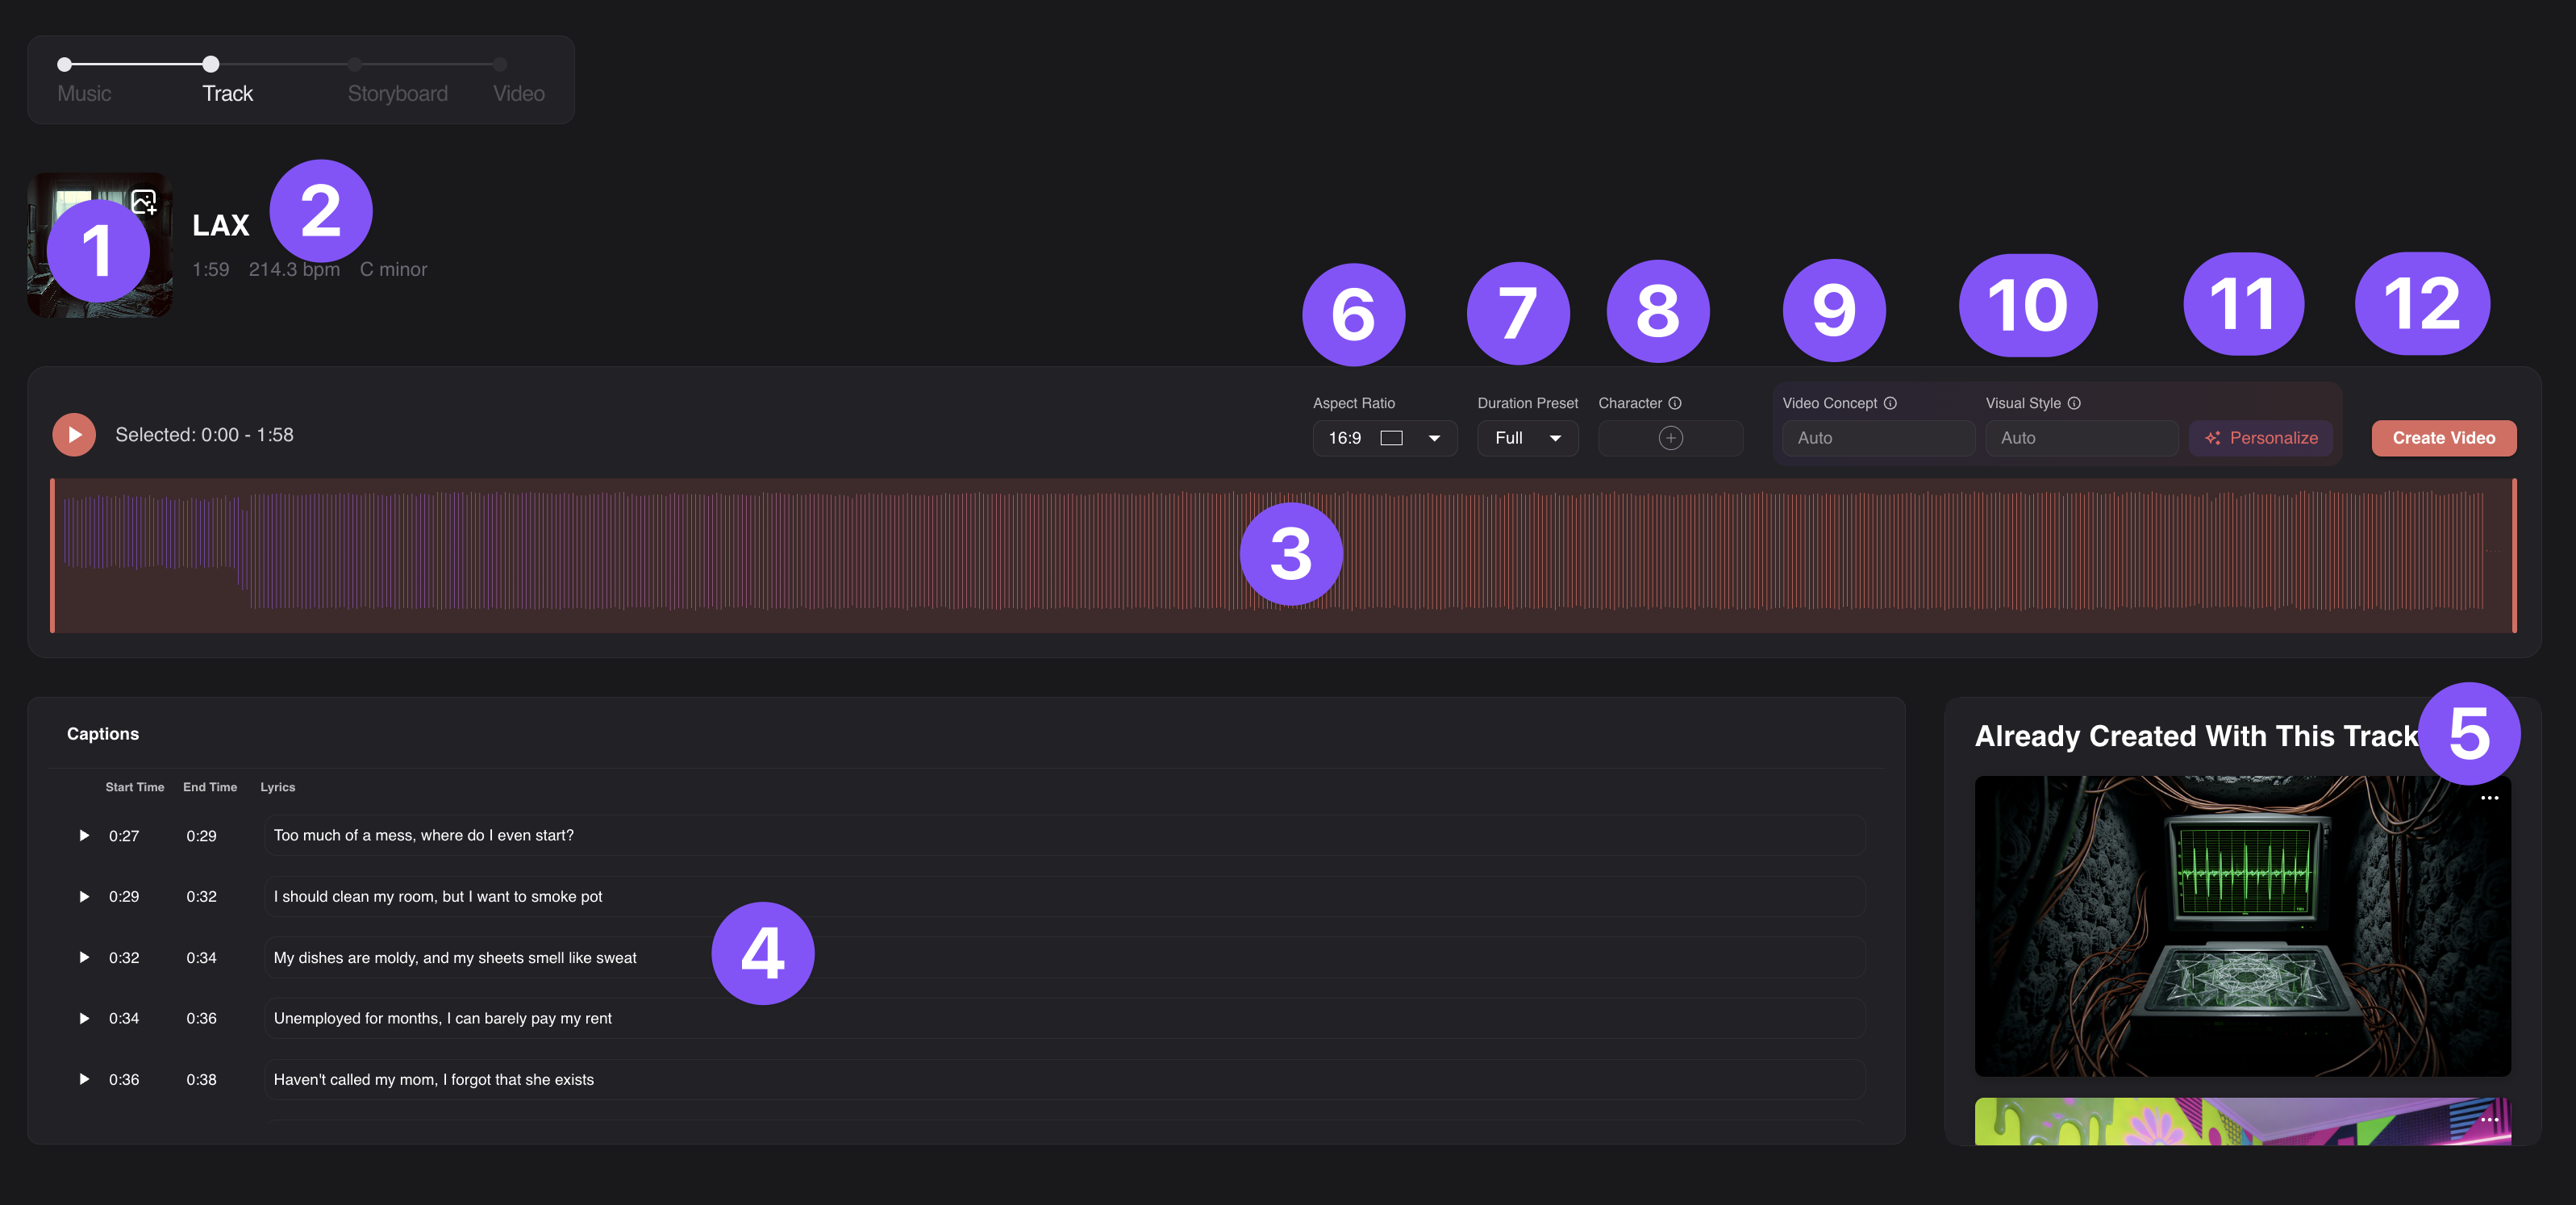
- In Track, open Character → New Character; upload an image or create the character, then name it.
- Select the saved character and use @CharacterName in relevant prompts. Check the character indicator on the keyframe before generation.
 OpenArtShow steps
- Create and save the performer in the Character workspace. Reuse that character in Director.
- Reference the saved identity with its @name and keep the same character assets across scene edits. Check each planned scene.
 PixoShow steps
- Set the intended performer and direction for the uploaded song, then inspect the storyboard’s character and scene choices.
- Keep the approved performer through shot revisions. The public description does not specify a universal @character syntax; use the controls available in your project.
 KaiberShow steps
- For Montage 2.0, use Reference mode with a clear subject and the intended setting. For changing locations, use Sequence and describe the same identity across them.
- Inspect faces and clothing across the result. The official workflows describe generated reference sheets; reuse the saved sheets when making replacement clips.
 SolmiShow steps
- Approve the cast reference images in Director before rendering the storyboard.
- Inspect each frame against those references. Rewrite or regenerate the drifting shot rather than replacing every shot; check the charge first.
Ready to continue: Each test scene uses the intended saved character or reference. A matching name in prose alone is not proof.
3Check three stills before committing to motion
Plan a front-facing medium shot, a wider shot and a modest change of angle. Use the same character and outfit. If you change the model, reference and lighting together, you will not know which change caused the drift.
This illustration uses crops of one website image to show what to inspect. It is not evidence that a tool preserved a character across independent generations.
- Compare face shape, hairline, eye spacing and your defining details beside the original reference.
- Check the outfit and accessory placement separately. A stable face with changing clothing may still break the sequence.
- Mark each image keep, revise or replace. Describe the mismatch in plain language, such as “hair became shoulder-length,” before changing a prompt.
Neural Frames provides Generate Starting Images before the full video pass. In other tools, use the available reference, storyboard or scene-image review stage; do not assume every mode exposes the same controls. [7]
Ready to continue: Approve identity in the planned frames before paying to animate scenes that already look wrong.
4Watch the face through the whole shot
Play at normal speed, then inspect the first, middle and last frames. Look for changes during a head turn, a hand crossing the face or a fast camera move. A good opening image does not establish consistency through the clip.
- Identity changes after a turn
- Try a gentler turn or a more stable angle while keeping the reference and model unchanged.
- The outfit changes between scenes
- Make the clothing description identical and inspect the relevant scene image. Correct that scene before rebuilding the sequence.
- The same shot keeps failing
- Set a retry limit. Replace it with a simpler framing or a cutaway if another attempt is unlikely to improve the edit.
Ready to continue: The chosen clip preserves recognizable identity during motion, not only in the thumbnail.
5Choose a coherent sequence and save its settings
- Watch adjacent shots together. Check that changes in framing feel intentional and the performer still reads as the same person.
- Keep the strongest usable version; save the rejected version with a note about the problem.
- Record the reference filename, character name, prompt, model, output settings and credits for each selected shot.
- Use the downloaded brief for the next project. Update it only after a change improves comparable shots.
If singing is the remaining problem, keep the approved character and diagnose the audio in the lip-sync guide. Changing identity and timing in the same retry makes both harder to judge.
Ready to continue: Your final sequence has a consistent performer and a record of which reference and settings produced the usable shots.
Keep a record for your next attempt
Download a worksheet to record your own inputs, settings and costs.
Download the character briefSources & workflow notes
Original tool research checked 17 November 2026; Kaiber and Solmi checked 18 November 2026. Official documentation explains the controls; attributed creator reports provide context for the checks suggested in this guide.
- Neural Frames: the four stages of AutopilotOfficial handbook and annotated interface screenshot · updated 2026-04-09
- OpenArt: Director modeOfficial product page
- OpenArt: trial and character workflowVendor-authored guide
- Pixo: music-video workflow and upload limitsOfficial product page and public creation form
- A creator’s OpenArt Director dance videoCreator-reported result on a vendor community
- Kaiber: Music Video Montage 2.0Official workflow guide and interface image
- Kaiber: Music Video Sequence 2.0Official workflow documentation
- Solmi: music-video DirectorOfficial workflow and credit documentation
- freebeat: Agent 2.0 workflowOfficial documentation / public interface · updated 2026-08-25
- Neural Frames: multiple character consistencyOfficial documentation / public interface · updated 2026-01-22
- OpenArt: Character workspaceOfficial documentation / public interface
Controls and plan eligibility can change. Confirm the model, quote and account conditions in your project. See our research notes for the scope of the sources used here.
Sources and research notesSave this page
Save this page to revisit the sources and advice, or share it with someone working on a music video.